Monday, May 03, 2010

The blog has moved!

I've decided to migrate from Blogspot.com and Blogger to Wordpress on my main web page at http://www.brokentoaster.com/

You can find the new blog at http://www.brokentoaster.com/blog/

The RSS feed is at feed://www.brokentoaster.com/blog/?feed=rss2

Apologies for any inconvenience this may cause.

Saturday, April 24, 2010

Back in the UK

Just got back to the UK after a volcano related extension to my holiday in NZ. I've also fixed the EAGLE files link for the Arduino MP3 player shield mentioned in this earlier blog post

Tuesday, March 30, 2010

reprap first print! - video

Saturday, March 27, 2010

Reprap first print!

Mendel livesReprap Steper motor driver

After four months of soldering and mucking about with screws and metal things I finally have a working 3D printer.

This was built using Makerbot electronics and aluminium versions of the printed parts. I will publish the drawings of the machined parts as soon as I have 1) tidied them up, 2) fixed the mistakes I put on them and 3) confirmed the design actually works. I made a few changes from the designs released in November in order to make them machine-able, but for the most part they are true to the original designs and taken from the STEP files or the STL files converted back into CAD files.

I've deliberately mounted the electronics in an open fashion on standoffs on an aluminium base plate to facilitate testing as I plan to improve and refine the design. I'd like to improve the electronics, PCB design and location of boards with an eye towards EMC and proper shielding, but for moment they are open to allow scope and multimeter access. I hope to tidy up all the cables into tidy looms and things a bit once I'm happier with the performance and reliability. I had an opto-interrupter board fail on me which resulted in a couple of crashes so I've temporarily replaced them with some very cheap push buttons. Probably a short circuit on the veroboard versions I built up, that'll teach me for being too cheap to pay $1 for a decent PCB.

Repraped Lego brick gear, brick and gear

I am reasonably happy with these prints as a first attempt. I think I really need to tweak the settings and the operation of the extruder to get things working better. (The part designs are from Thingiverse parametric spur gears, Thingiverse parametric Lego block)

I'm quite glad to notice the latest version of host software is functioning on OS X, it saves me having to boot up windows every time I want to print. I say functioning and not working as it doesn't quite fit all the controls on the screen nicely and does odd things every now and then. But it is better than it was a couple of months ago and so it is looking good for the future.

Sadly I'm off home to NZ for a few weeks so wont get a decent chance to to get it all going properly till the end of the month. On the other hand the software may have moved forward another step by then as well and I might even take the time to read the instructions.

Labels: ,

Monday, February 15, 2010

Arduino MP3 Rev B v0.0


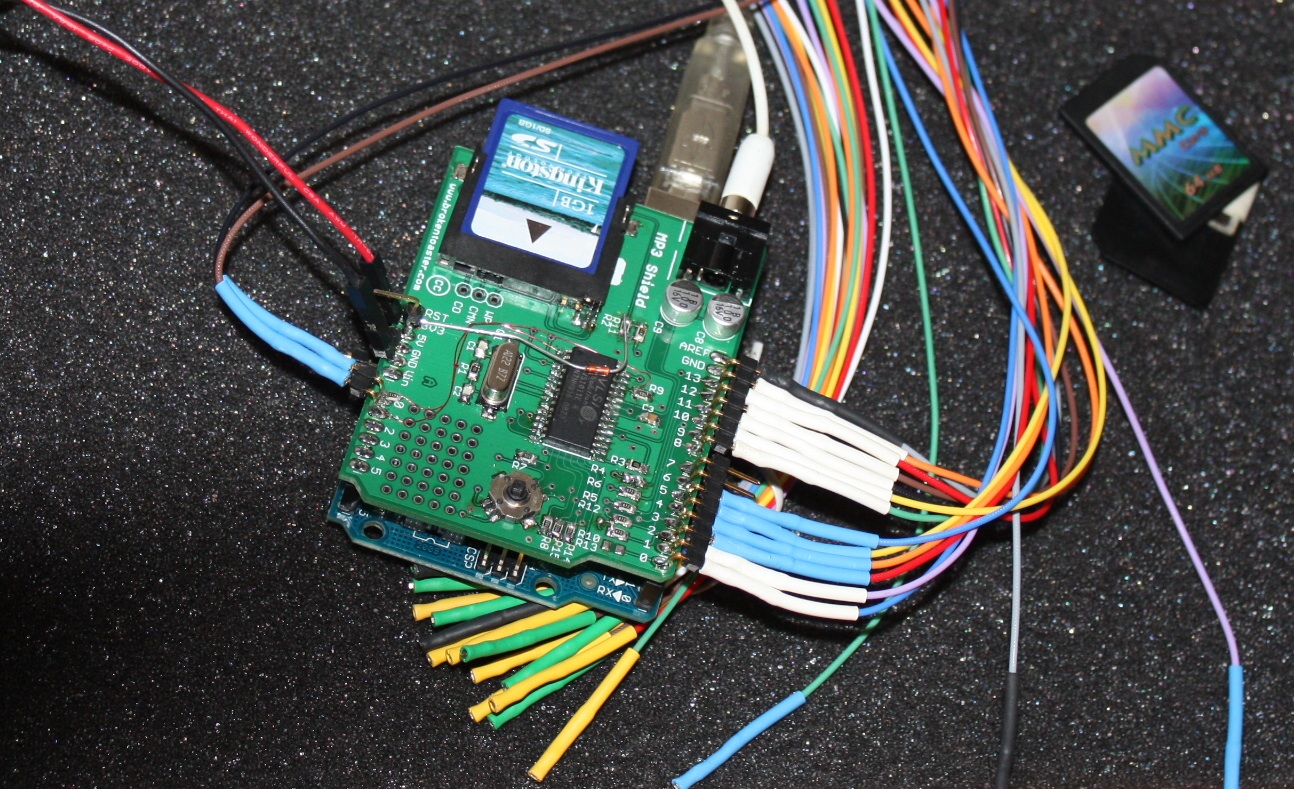
Last week I managed to have some luck with my Arduino MP3 shield. The big hold up was caused by not having enough power from the FT232RL chip to supply the decoder and the memory card at the same time (50mA max d-oh). I also had a software issue, I had not altered the code to deal with the 16Mhz clock speed of the arduino from the 8Mhz I was using on the ButterflyMP3 project. The SPI clock was running at 8Mhz where it needed to be slower than 6MHz (to comply with the VS1011E datasheet). Once I had that sorted everything just popped into place and started working reliably.

I apologise in advance for the poor integration of the library examples. I have simply and quite roughly ported the minimal parts of my buterflymp3 project over to the arduino and this hardware. The examples will test reading FAT16 file system on the MMC/SD card, test the VS1011E decoder chip, and play the first mp3 file found on the memory card. I hope to get these tidied up later but have not had any time to do so lately.

The PCB has not actually been tested yet so I'd hold off building a million of these until after a successful test. There is unlikely to be much wrong with it though as I have simply added a voltage regulator and re routed a couple of signals to fix my earlier mistakes. ( I'd forgotten that I/O lines 0 and 1 are used by the uart on the arduino)

I have embedded the BOM below. ( The bom is here if you don't see it below)


Here are all the files so far. These are all released under a Creative Commons 2.5 license .

EAGLE files are here

GERBER files are here

Arduino Library files are here

PDF of the schematic is here

To use the library simply put the "mp3" folder from the zip file inside the "libraries" folder in your arduino folder (create one if it doesn't exist). Restart Arduino 018 or later and you should have "mp3" entries in the menus under examples and import libraries.

The BOM references a 2.8V LDO voltage regulator but the schematic shows a 3.3V. Either will work fine but the 2.8 will give you slightly lower power usage.

If you are interested in PCBs or kits, drop me a line at buy_pcbs@brokentoaster.com
As always any comments, suggestions or ideas are welcome.

Labels: , , ,

Wednesday, January 20, 2010

Reprap extruder heater


My cheap polymide tape arrived from Hong-Kong yesterday so I was able to get the heater built on the extruder for the reprap. No problems with the construction of the heater itself, although after running some tests I discovered the thermistor I had chosen is only rated to 155 degreees Celcius. I obviously wasn't looking very hard when I ordered it or perhaps it was just the fact that it was one tenth the cost of a more suitable device that convinced me to buy it. I should have a new thermistor in this week and replace this one.

Before going too far with my heater I wanted to test the system and check that the temperature measured was accurate. I ran three sets of tests. Using the Butterfly Logger with some DS18B20's and a SHT71 I logged the temperature of the barrel at the edge of the extruder (see close up above). The SHT-71 was used to monitor the extruder temperature with the DS18B20's monitoring ambient. The first test was logged at 10 second intervals with the later two logged each second.

TEST 1
The first test was a 0.2 deg C/s ramp from near ambient up to 75 deg C and then a step change to 100 deg C and then passive cooling. This is shown in the plot below. The period of 10 seconds seemed too slow to give me a good idea of the stability so n the following tests it was decreased to 1 second. This did show rough correlation between the set temperatures and the measured temperatures although not really as accurate as I had hoped.


TEST 2
This test was a controlled ramp of 0.2 deg C/s from near ambient up to 100 deg C. After holding at 100 deg C the system is passively cooled to 50 deg C. The system holds at 50 deg C momentarily before being given a step change to 100 deg C, after which the system is allowed to cool to ambient.
The better time resolution allows the system stability to be better assessed. The system looks reasonably stable at the 100 deg hold mark. Here it is cycling around 5 deg around the set point. The 'stable' temperature is slowly rising which I attribute to the thermal mass of the barrel and thermal barrier warming up. It is not 100 deg C as it is not measuring at the same point where the control thermistor is measuring. Looking at this initially lead me to check the characteristics of the thermistor I was using and is what lead me to discover that it was only rated at 155 deg C. In checking the data sheet I also noticed a diference in the Beta value fromt he look up table used in the extruder firmware. I recalculated the look up table accordingly and repeated the tests in test 3.


TEST 3
This was a repeat of the previous tests with the new lookup table ( Beta = 4400). This seemed to give a ramp rate twice of what was programmed (0.45 deg C/s compared to 0.2 deg C/s). The temperatures seemed hotter which is expected given the change in thermistor table for the control firmware.


The next test will of course be to see how the system performs when loaded i.e. extruding some plastic.

Labels: ,

Sunday, January 17, 2010

Reprap Electronics build


I ran out of time this weekend to get anything done on the MP3 shield or the MLMC projects. I did however manage to find time to solder up the electronics for my reprap I'm building. After a couple of hitches I also got the firmware on and up and running.I had to download the latest from SVN else I got a clash between the stepper-motor drivers and the servo motor drivers in the firmware for the extruder.

I built the mother board to use a standard PC power connector even though I'm building a reprap. It just seemed silly to power this PCB via USB and then rig the power-supply to power all the other boards. I temporarily used the USB 5V to power the PCB via a pin on the JTAG connector during programming the firmware. Before the firmware on the mother board was programmed the PC PSU wouldn't fire up so I needed a temporary power supply.

I managed to test the extruder board with some test software I found at http://objects.reprap.org/wiki/Microcontroller_Firmware_Hints#Driving_Steppers_with_the_Extruder_Controller_V2.2_.28Arduino_inside....29. But I haven't managed to get it working through the mendel firmware via the host software yet. The thermistor was working so I know the RS485 link is functioning properly. Probably just a configuration.h option I've over looked.

It took a couple of hours to get the three boards all soldered up and tested. I'll post more when I have more done. I'll probably be focusing on the mechanical side of building the Cartesian robot for now so not much electronics left to do, although I still have the firmware to sort through...

[EDIT] It turns out that I had overlooked the I2C connection between the motherboard and the extruder board. I should really have read the instruction.

Labels: ,